Project 3
Disclaimer
Please DO NOT distribute project material or solutions online (e.g. public GitHub repositories). We take violations of the honor code very seriously.
Overview
The objective of this project is to implement a robot choreography system that executes a dance routine with a Finite State Machine controller over joint angle setpoints. You will be implementing:
Quaternion joint rotation in
kineval/kineval_quaternion.js(for quaternion functions) andkineval/kineval_forward_kinematics(to add axis-angle joint rotation to existing kinematic traversal)Joint limit enforcement in
kineval/kineval_controls.jsPrismatic joint implementation in
kineval/kineval_forward_kinematics.jsInteractive base control vectors in
kineval/kineval_forward_kinematics.jsPose setpoint controller in
kineval/kineval_servo_control.jsDance FSM in
kineval/kineval_servo_control.js(FSM controller) and “home.html” (dance setpoint initialization)
Instructions
- Download Project 3 - 6 stencil and copy your project 2 solutions into the necessay files.
- Note that we have updated all the documentation in this release so you should not have to do this copy pasting again.
- Our solutions to project 2 will be released on 02/16/2025 (Sun), 3 days after project 2 is due.
- Quaternion functions in `kineval/kineval_quaternion.js
- We represent quaternions as Objects(like python dictionaries) with keys a, b, c, and d.
- Uncomment the functions in the code and implement them. They should all be pretty straightforward implementations.
- Joint state and control in
kineval/kineval_control.jskineval/kineval_forward_kinematics.js- Going beyond the joint properties you worked with in project 2, each joint of the robot now needs several additional properties for joint rotation and control. These joint properties for the current angle rotation
.angleand applied control.controlhave already been created within the functionkineval.initRobotJoints(). The joint’s angle will be used to calculate a rotation about the joint’s (normal) axis of rotation vector, specified in the.axisfield. - You should extend your FK implementation in
kineval/kineval_forward_kinematics.jsto account for the additional rotations of joints based on their.type. Specifically you should only need to modifykineval.traverseFKJoint()to account for additional rotations. There is another thing you will need to do in this file a litte bit later! You should complete the stencil for
kineval.applyControls()inkineval/kineval_control.jsto enforce the joint angle limits.- Things to keep in mind for these two files:
- There are many types of joints please make sure you understand these well as this will help you make implementation much quicker:
- continuous: rotation about the joint axis with no joint limits
- revolute: rotation about the joint axis with joint limits
- prismatic: translation along the joint axis with joint limits
- fixed: no motion of the joint
To check the type of a joint, you can check
.typewhich will be a lowercase string.Joint limits can be acquired from using
joint.limit.lowerandjoint.limit.upper- If joint axis rotation is implemented correctly, you should be able to use the ‘u’ and ‘i’ keys to move the currently active joint. These keys respectively decrement and increment the
.controlfield of the active joint. Through the functionkineval.applyControls(), this control value effectively adds an angular displacement to the joint angle.
- Going beyond the joint properties you worked with in project 2, each joint of the robot now needs several additional properties for joint rotation and control. These joint properties for the current angle rotation
Interactive base movement controls in
kineval/kineval_forward_kinematics.js- The user interface also enables controlling the global position and orientation of the robot base. In addition to joint updates, the system update function
kineval.applyControls()inkineval_controls.jsalso updates the base state (inrobot.origin) with respect to its controls (specified inrobot.controls). With the support functionkineval.handleUserInput()inkineval_userinput.js, the ‘wasd’ keys are purposed to move the robot on the ground plane, with ‘q’ and ‘e’ keys for lateral base movement. In order for these keys to behave properly, you will need to add code to update variables that store the heading and lateral directions of the robot base:robot_headingandrobot_lateral. These vectors need to be computed within your FK implementation inkineval/kineval_forward_kinematics.jsand stored as global variables. They express the directions of the robot base’s z-axis and x-axis in the global frame, respectively. These variables represent points (0, 0, 1) and (1, 0, 0) in the robot’s coordinate frame wrt the world, and should be a homogeneous column vector in the form:[[?], [?], [?], [1]]. - Some students may have already implemented this during project 2.
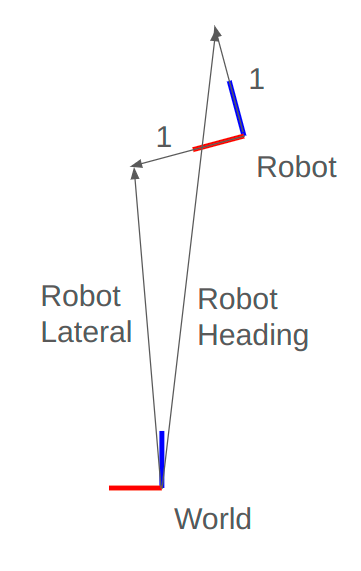
- If
robot_headingandrobot_lateralare implemented properly, the robot should now be interactively controllable in the ground plane using the keys described in the previous paragraph.
- The user interface also enables controlling the global position and orientation of the robot base. In addition to joint updates, the system update function
- Pose setpoint controller in
kineval/kineval_servo_control.jsOnce joint axis rotation is implemented, you will implement a proportional setpoint controller for the robot joints in function
kineval.robotArmControllerSetpoint()withinkineval/kineval_servo_control.js. The desired angle for a joint ‘JointX’ is stored inkineval.params.setpoint_target['JointX']as a scalar by the FSM controller or keyboard input. The setpoint controller should take this desired angle, the joint’s current angle.angle, and servo gains (specified in the.servoobject) to set the control (.control) for each joint. All of these joint object properties are initialized in the functionkineval.initRobotJoints()inkineval/kineval_robot_init_joints.js. Note that theservo.d_gainis not used in this assignment.Once you have implemented the control function described above, you can enable the conroller by either holding down the ‘o’ key or selecting ‘persist_pd’ from the UI. With the controller enabled, the robot will attempt to reach the current setpoint. One setpoint is provided with the stencil code: the zero pose, where all joint angles are zero. Pressing the ‘0’ key sets the current setpoint to the zero setpoint.
Besides the zero setpoint, up to 9 other arbitrary pose setpoints can be stored by KinEval (in
kineval.setpoints) for pose control. You can editkineval.setpointsin your code for testing and/or for the FSM controller (see below), but the current robot pose can also be interactively stored into the setpoint list by pressing “Shift+number_key” (e.g., “Shift+1” would store the current robot pose as setpoint 1). You can then select any of the stored setpoints to be the current control target by pressing one of the non-zero number keys [1-9] that corresponds to a previously-stored setpoint. At any time, the currently stored setpoints can be output to the console as JavaScript code using the JSON.stringify function for the setpoint object:JSON.stringify(kineval.setpoints);. Once you have found the setpoints needed to implement your desired dance, this setpoint array can be included in your code as part of your dance controller.Since you will need to implement your setpoint controller before your FSM controller, for additional testing of your setpoint controller, a “clock movement” FSM controller has been provided as the function
setpointClockMovement()inkineval/kineval_servo_control.js. This function can be invoked by holding down the ‘c’ key or from the UI.
FSM controller in
kineval/kineval_servo_control.js- Once your pose setpoint controller is working, an FSM controller should be implemented in the function
kineval.setpointDanceSequence()inkineval/kineval_servo_control.js. The reference implementation switches between the pose setpoints inkineval.setpointsbased on two additional pieces of data: an array of indiceskineval.params.dance_sequence_indexand the current pose indexkineval.params.dance_pose_index.kineval.params.dance_sequence_indexwill tell your FSM the order in which the setpoints inkineval.setpointsshould be selected to be the control target. Note that using this convention allows you to easily select the same setpoint multiple times to produce repetition in your dance.kineval.params.dance_pose_indexis used to keep track of the current index within the dance pose sequence. The intended usage is to increment the setpoint index based on time, so that e.g. you stay on setpoint 1 for 1s, 2 for 0.5s, etc. It’s being called every frame because it’s part of the main loop, but you need not You can refer to kineval.setpointClockMovement() for getting the current time in seconds.
- Once your pose setpoint controller is working, an FSM controller should be implemented in the function
- Submit your
kineval/kineval_quaternion.js,kineval/kineval_forward_kinematics.js,andkineval/kineval_servo_control.jskineval/kineval_controls.jsfiles for grading- The autograder is available at https://cse-ag-csci5551.cse.umn.edu/
Deadline
This project is due on Wednesday, February 19th at 11:59pm CT.
(Optional) Bonus Task
The SPOT robot in our lab would also like to dance! See, it’s warming up now!
A bonus task will be to help the SPOT robot execute more dancing poses in a sequence! Please refer to the provided URDF files in P2 to construct the SPOT robot in simulation and use your implementations in P3 to execute the dancing poses.
Again, the bonus task won’t be graded but is highly encouraged for ambitious students.
Grading
The project is worth a total of 10 points.